


Visit the Rav.ai website to access the video editor here. You should have an active account on Rav.ai to start uploading projects. If you don’t have one, signup now.
Step 1: Upload your video
Click the Start New Project button in the top right. Next, Click Upload Media button, and you have the following options to upload media.
- Upload Form Computer
- Audio Recording
- Screen Recording
- Camera Recording
Choose your desired button. If you want to upload files from the computer, click “My Device” and select your media. If you want to combine many video clips, you can select multiple files. Also, you can easily add other clips later on in the editor.
Once you uploaded all of your files, click the done button in the bottom right. You can also add more files by clicking the button upper right corner.
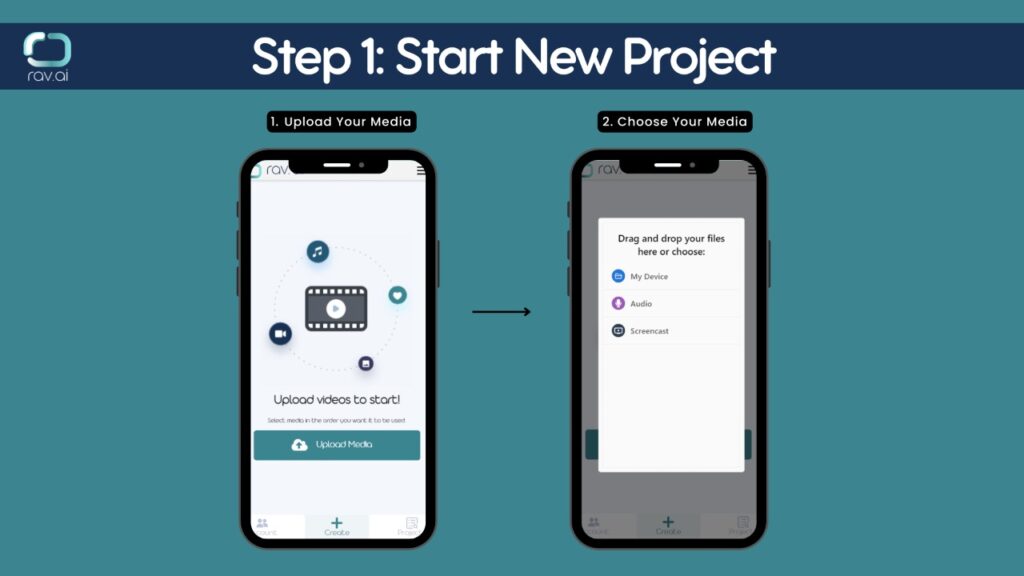
Once done with the upload, close the popup.
Step 2: Set Inspirational Link, Platform, Category, Edit Notes, and Submit
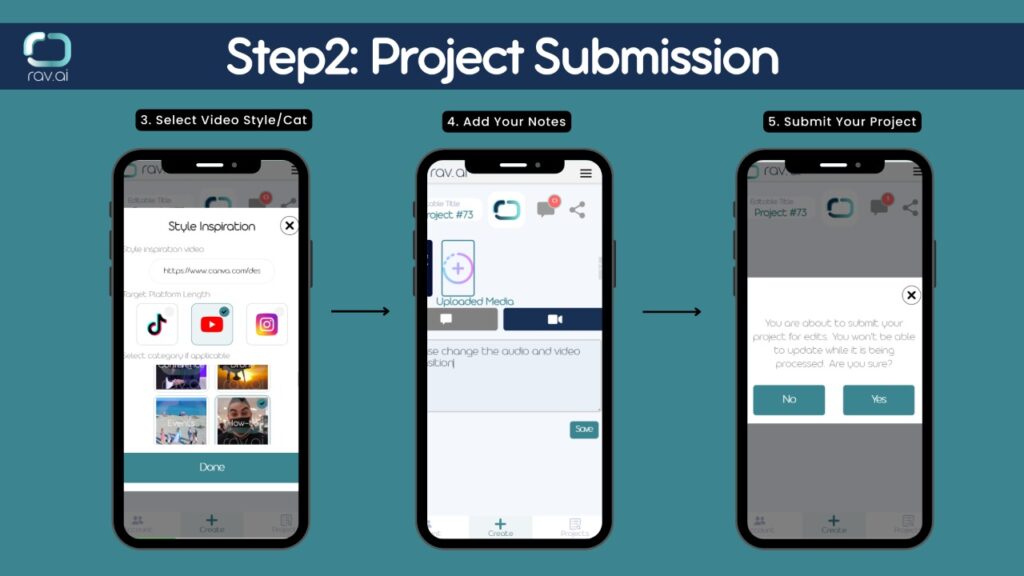
You can add a video link as an inspirational link to help the automated video editor. The platform will automatically understand your requirements and get your video edited.
You can easily choose the video category and theme on the platform. For example, you can choose Instagram, Youtube, TikTok etc according to your video requirements.
- Choose the Platform
- Select the category if Applicable
- Click Done
You can guide the platform about the type of video you need by adding edit notes. Edit notes are simple text that helps AI based platforms to understand user requirements.
Once you added the edit notes, click the save button in the bottom right.
Note: If you missed any file, you can add it by clicking the plus icon located with your uploaded files.
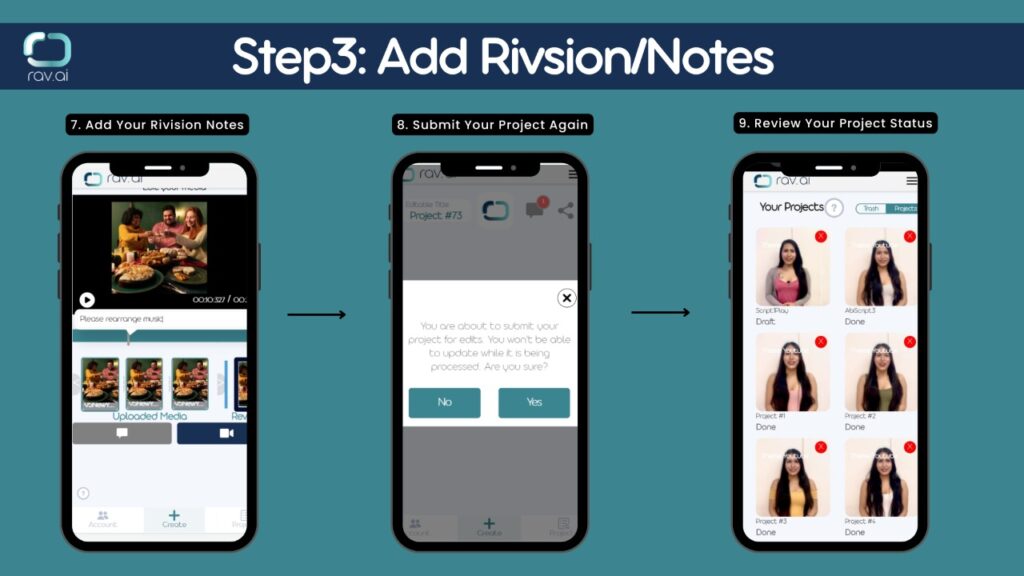
Once you submit all of your requirements, you can simply click the “Submit for Edits”.
The popup will ask if everything is ok! You just need to click “Yes”
You can see your project on the platform. Each of your projects will be assigned a number by the platform.
Usually, Rav.ai takes 3 hours to automatically edit the video.
Note: To get the highest quality video, you should properly add the edit notes and inspirational links for each video.
Once the editing is done, you will get a notification via email.
You can see the “In Progress” text change into “Complete” once you get the video back.
Step 3: Submit Revision (If needed)
Once you receive the video, you can play it on the platform and watch it to make sure it suits your requirements.
If you are not satisfied with the quality of the video, you can submit a revision. You can choose the part of the video you want to edit and submit edit notes at that particular part.
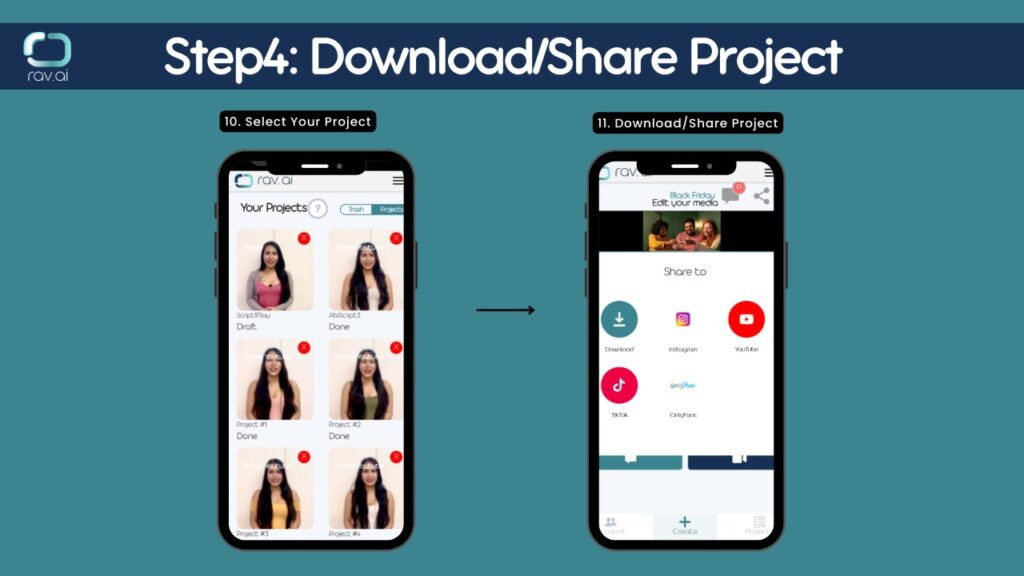
If you are satisfied with the video after revision, the next part is to download the video to your computer or share the video on Youtube, Instagram, TikTok, etc directly from Rav.ai.
Click the share icon.
If you want to download it to your computer, click the download button.
If you want to share on social media platform, select the relevant platform.
Step 4: Upload your video to YouTube
When you’re done, you may instantly publish your finished video from Rav.ai to YouTube. Click the Youtube.
A new popup will appear which asks you for selecting the Gmail account associated with your Youtube account.
In our case, I select “Social Media”.
As soon as you select your Youtube channel, the video will start uploading to Youtube directly from Rav.ai.
Once your upload is done, you will receive a notification.
You can log in to your Youtube channel to further optimize your video.
Similarly, you can share the video to TikTok, Instagram, and other social media platforms.